Overview
Imagine you trip and scrape your knee, or you hear about someone needing stitches after an accident. How do health care professionals help wounds heal properly so skin can close again and protect the body?
In this two-lesson experience, students learn how skin protects us, why it matters to close cuts in the skin, and how a simple interrupted suture can help wound edges come together. Using safe, simple materials, they practice a basic suturing technique on a simulated “wound,” compare it to a continuous suturing pattern, and are introduced to a few healthcare careers that support wound care and healing. An optional extension briefly explores newer wound care technologies such as smart bandages, nanoparticles, and 3D bioprinting.
Safety, careful technique, and respectful talk about medical work are emphasized throughout.
NB Curricular Connections
Science 5
- Strand: Scientific Literacy — Big Idea: Investigation — Skill Descriptor: Plan and conduct inquiry into healthy living and healing [active exploration]. Big Idea: Sense Making — Skill Descriptor: Use evidence and observations to interpret outcomes in medical practice. Big Idea: Communication — Skill Descriptor: Communicate findings and processes using scientific language.
- Strand: Learning and Living Sustainability — Big Idea: Responsible and Sustainable Application — Skill Descriptor: Apply scientific and technological knowledge and an understanding of sustainable practices responsibly with respect to simple machines and human systems.
English Language Arts 5
Strand: Interactions — Big Idea: Expression — Skill descriptor: Express and discuss thoughts, feelings, experiences, ideas and opinions, and consider those of their peers. Big Idea: Reception — Skill Descriptor: Receive and critically reflect on the ideas and opinions of others.
Science 6
- Strand: Scientific Literacy — Big Idea: Investigation — Skill Descriptor: Plan investigations to answer questions about relationships between and among variables observed in natural and technical sensory systems. Big Idea: Sensemaking — Skill Descriptor: Analyze and interpret qualitative and quantitative data to construct explanations and conclusions. Big Idea: Communication — Skill Descriptor: Communicate procedure, result, and conclusion using a variety of media and working collaboratively.
- Strand: Learning and Living Sustainability — Big Idea: Responsible and Sustainable Application — Skill Descriptor: Apply scientific and technological knowledge and an understanding of sustainable practices responsibly with respect to natural and technical sensory systems.
English Language Arts 6
Strand: Interactions — Big Idea: Expression — Skill descriptor: Describe and contribute thoughts, feelings, and experiences, and compare to those of their peers. Big Idea: Reception — Skill Descriptor: Critically reflect on the contribution of others.
Core learning goals (two‑lesson block)
By the end of this two-lesson experience, students will be able to:
- Explain how skin protects the body and why closing cuts is important
- Describe skin as a protective barrier and explain, in simple terms, that cuts create openings where germs can enter.
- Use a simple art-based model to show how stitches can help a wound close
- Follow step-by-step instructions to place and tie a series of basic interrupted stitches on a painted cardstock “wound,” and explain how the stitches help pull the wound edges together so healing can begin.
- Compare an interrupted pattern (one stitch at a time, tied separately) with a continuous pattern (one long line tied at the beginning and end) using the classroom model and Teacher Appendix figures.
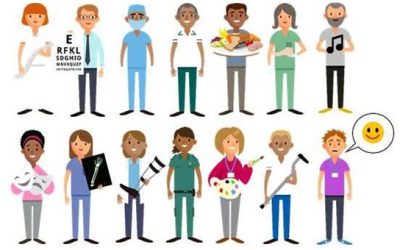
- Identify a small range of health care roles that support wound care and recovery
- Recognize that more than one kind of health care professional (for example, nurses, physicians, and dentists) may be involved in caring for wounds and may work with stitches or wound care technologies as part of a team.
What You’ll Need
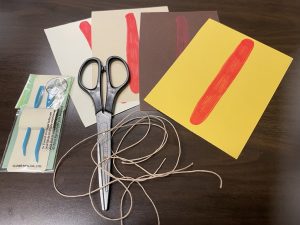
DIY Suturing Kit:
- Heavy cardstock wound model with a painted “bleed” and pre‑scored suture holes
- Hemp cord or similar thick thread, yarn, or string
- Blunt needle (safe for classroom use)
- Needle holder, tweezers, or similar tool
- Simple tool for holding the card steady (clipboard, masking tape, or foam board, if used)
- Scissors
- Disposable gloves (optional)
Together, these materials create a safe, art-based model using paint, cardstock, hemp cord, and a blunt needle to simulate how stitches can help bring a wound together.
Lesson structure (recommended)
Lesson 1 (≈45 minutes): Slides 1–9 — skin as protection, what happens when skin is cut, why some wounds are closed, and a short careers showcase linked to wound care.
Lesson 2 (≈45 minutes): Hands-on suturing experience using the arts-based materials and tools, with interrupted sutures as the main pattern, followed by optional viewing of Slides 10–16 on modern wound-closure technologies.
Instructions
Lesson 1 – Conceptual launch (using slide deck) *see attached Artful Suturing Presentation Deck with and without Teacher Talk Track*
- Use Slides 1–6 to build understanding of skin as protection, what happens when skin is cut, and why some wounds are closed.
- Use Slide 7 to preview that many healthcare roles support wound care, not just surgeons.
- Use Slides 8–9 to briefly introduce four careers. Invite students to notice what the people do, the talents they use, and, if you wish, compare the salary numbers as a numeracy connection.
- End with a short discussion: “Why might closing a wound help the body heal?” and “What healthcare jobs might be involved when someone has a cut or injury?”
Lesson 2 – Hands-on suturing practice
- Remind students that this is a safe, art-based simulation using classroom materials — no real injuries or skin will be used.
- Review the safety checklist: set up a clean workspace, handle the blunt needle and other tools carefully, and use gloves if your classroom plan includes them.
- Show the printed demonstration diagram of a simple interrupted suture (Figure 1) and/or the suture spacing figure (Figure 2) from the Teacher Appendix *See attached Teacher Appendix with or without notes*. Point out how each stitch helps bring the two sides of the “wound” closer together and how even spacing helps the wound model close more neatly.
- Give each student, or pair of students, a cardstock wound model with the painted “blood” and pre-scored suture holes.
- Guide students to try the steps on their cardstock wound model:
- Thread the blunt needle with a length of hemp cord. Start at one end of the “wound.”
- Pass the needle down through a hole on the topside (epidermis) and up through the matching hole on the other side.
- Pull the cord gently so it sits snugly across the wound model.
- Tie a square knot to keep the stitch in place. Use Figure 3 from the Teacher Appendix to show that the knot should feel secure, but not so tight that it pulls too hard on the paper.
- Trim the excess cord if needed. This completes one interrupted stitch.
- Repeat the process to make a short series of stitches, using the pre-scored holes to support even spacing.
- Circulate to support students, watching for cord tension, spacing, and knot security. Help students notice the difference between a stitch that is too loose, too tight, or just right.
- Invite students to look closely at their finished wound model and notice how the stitches changed the shape of the gap by helping the two sides come closer together.
- If time and readiness allow, briefly show Figure 4 – Continuous Suture as a comparison. Explain that an interrupted suture is tied one stitch at a time, while a continuous suture uses one longer piece of cord and is usually tied at the beginning and the end.
- End by cleaning work surfaces, returning materials to storage, and removing gloves if they were used.
Extension ideas (Grade 6+)
- If time and readiness allow, use Slides 10–16 to introduce modern wound closure methods (smart bandages, nanoparticles, 3D bioprinting) as enrichment, emphasizing curiosity rather than mastery *See attached Artful Suturing Presentation Deck, with and without Teacher Talk Track*.
Additional Extension ideas (Grade 6+)
- Research one modern wound care technology from the slides (smart bandages, nanotherapeutics, or 3D bioprinting) and create a short “Did you know?” card for the class.
- Invite a local nurse, doctor, or other healthcare professional to share real‑world stories about wound care (no graphic details) and how they support healing as part of a team.
- Explore additional careers in health and social care using the Centre of Excellence “Careers in Health” resource and connect them to wound care or healing *See attached Careers in Health resource*.
Reflection Activity
Debriefing and Discussion:
- What did you learn about how skin protects the body?
- How did your stitches help bring the edges of the “wound” together on the cardstock wound model?
- Why is safety important when people work with real wounds in health care?
- Which healthcare careers from today’s lesson support wound care or healing? What talents do they use?
Global Competencies
- Students work in pairs or small groups, offering each other feedback and sharing tips to improve results.
- Students ask for help, follow instructions, and clearly explain or demonstrate their suturing technique to peers.
- Students solve small practical problems (for example, how to place stitches evenly or adjust tension) and make decisions during suturing practice
- Students adapt low-tech or high-tech solutions and may design their own wound model/tools using available resources.
- The lesson emphasizes ethical use of resources (no food for simulation), responsible safety practice, and awareness of healthcare access and careers in a global context.
Acknowledgments
Content developed in collaboration with Janice D. Williams, B.A. Hon., B.Ed., M.P.Ed., OCT. Pinnacle Educational Services.
Skin Lacerations (2025, May).
By Adam J. Singer, MD, Stony Brook University, Renaissance School of Medicine.
Reviewed by Diane M. Birnbaumer, MD, David Geffen School of Medicine at UCLA.